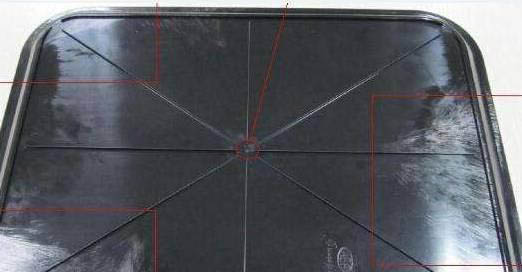
In the fascinating realm of injection molding, plastic products are akin to living entities brought to life from molds. However, there are always "uninvited guests" that disrupt this perfection, and silver streaks are a prime example. Imagine eagerly retrieving a newly molded part, only to find its surface adorned with delicate lines resembling silver spider webs. These not only mar the aesthetics but can also compromise the part’s strength, shorten its service life, and even pose safety risks in critical applications. So, how can we conquer this "pretty nuisance"? Let’s delve into the details.
Silver streaks don’t appear out of nowhere; they are the result of multiple factors converging during the injection molding process. From a professional standpoint, the primary causes can be broken down as follows:
Plastic raw materials are like a diverse group of companions—they tend to act up when not in optimal condition. When raw materials contain moisture, volatile substances, or impurities, these "disruptive elements" rapidly vaporize under the high-temperature, high-pressure environment of injection molding, forming bubbles. As these bubbles burst during melt flow, they leave silver streaks on the product’s surface. For instance, hygroscopic materials like nylon and polycarbonate are highly susceptible to silver streaks if not thoroughly dried before molding—imagine them entering the mold with a "dampened spirit."
Injection molding parameters are the backbone of the process, much like a conductor’s baton guiding an orchestra. Even slight deviations can throw the entire "performance" off balance. Excessively high melt temperatures can degrade the plastic, generating gas, while too-low temperatures lead to poor plasticization and sluggish flow, trapping air. A too-fast injection speed causes the melt to rush through the mold like a runaway horse, creating turbulence that prevents air from escaping. Conversely, a too-slow speed may allow the melt to cool prematurely during filling, forming weld lines and creating pockets for gas entrapment. Inadequate injection pressure or holding time can also let gas settle within the part, eventually manifesting as silver streaks.
The mold is the "cradle" of plastic products, and flaws in the cradle inevitably affect the "newborn." Poorly designed runners—such as those that are too narrow or have abrupt bends—increase melt flow resistance and create uneven flow, trapping gas. Improper gate placement can cause the melt to swirl during filling, dragging air into the part. A subpar venting system is like a room without windows: gas cannot escape the mold cavity, becoming trapped and forming silver streaks. Complex molds with deep cavities or narrow slots are particularly prone to this issue if venting slots are inadequate or misplaced.
Now that we understand the causes, we can develop targeted solutions to restore the smooth, flawless "skin" of plastic products.
Hygroscopic materials require the care of a doting guardian. Before molding, they must undergo rigorous drying according to their specific needs. For example, nylon typically needs 8–12 hours of drying in a vacuum oven at 100–120°C to reduce moisture content below 0.1%. Heat-sensitive materials like polyoxymethylene (POM) require careful control of drying temperature and time to prevent degradation. During storage, raw materials should be protected from moisture and dust—use sealed containers and maintain low workshop humidity to keep them in "prime spirits."
Adjusting process parameters demands the precision of a master conductor. First, optimize melt temperature: determine the ideal range for each material through testing, ensuring full plasticization without degradation. For example, polycarbonate (PC) typically molds at 280–320°C; use thermocouples to monitor barrel and mold temperatures in real time. Next, balance injection speed and pressure: slower speeds with higher pressure work for simple, uniformly walled parts to minimize air entrapment, while faster speeds with moderate pressure suit complex or thin-walled designs to prevent premature cooling. Holding pressure and time are crucial too—too short leads to shrinkage, too long risks flash and streaks. As a rule of thumb, add 5–10 seconds of holding time per 1mm of wall thickness. Finally, optimize cooling time: insufficient cooling causes stress and streaks, while excessive cooling wastes time. Use part demolding ease and dimensional stability as guides.
Mold design is pivotal. Like skilled architects, focus on optimizing flow paths and vents. Design runners with gradual cross-sectional changes to reduce turbulence, and place gates in thick-walled areas to avoid eddies; multiple gates can balance flow in large or complex parts. For venting, machine slots at the highest points of the cavity and melt flow fronts, typically 0.02–0.05mm deep and 5–10mm wide. In hard-to-vent areas like deep cavities, use inserts, vented ejector pins, or breathable steel. Regular mold maintenance is key—keep surfaces polished to prevent rough spots that trap gas. Use specialized cleaners and polishing tools to maintain precision and performance.
Silver streaks may be a persistent headache in injection molding, but with a deep understanding of their causes and a scientific approach to solutions—from material care to process precision and mold craftsmanship—we can triumph over this "elegant adversary." Every detail matters, just as a master craftsman perfects each stroke to create a masterpiece. Let’s strive together to weave a future in injection molding where plastic dreams are born flawless, free from the shadow of silver streaks.
We hope this article clarifies how to tackle silver streaks in injection molding. If you need further details or wish to discuss specific points, feel free to reach out!


